Sunday, November 4, 2012

More Pics Backstage at Wicked


Lynn and I were two lucky ladies last Saturday. Here we are backstage at The Gershwin Theatre in New York City an hour before the curtains came up for Wicked.


 ~ The Great Wizard of Oz ~


Here's the real Wizard of Oz, actor Adam Grupper (left), and John (right), head carpenter at The Gershwin Theatre in New York City. John was a good sport. We're extremely grateful for the backstage tour. I especially loved walking down the "suicide stairs" he built into the back of the stage for quick exits. What a trip that was!

I also enjoyed walking through the green room and getting a glimpse of the actors before the show. They looked as calm and cool as can be.  Walking through the orchestra pit was a tight squeeze.


 Here we are on stage in front of the house that blew away in the tornado.


 ~ Glinda's "bubble" ~


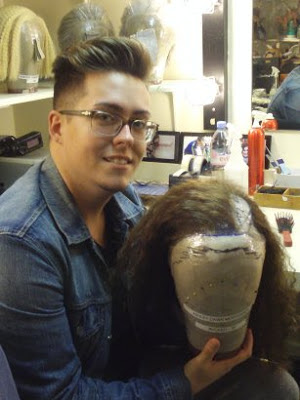
 ~ A professional craftsman creating a wig for a member of the cast ~


~ The masks for the flying monkeys and Dr. Dillamond (the goat) ~

Sunday, October 28, 2012

Backstage at the Gershwin Theatre in NYC


When my friend Lynn said she knew someone who would give us a backstage tour of the Gershwin Theatre before the first showing of Wicked, I told her to count me in.


 To be on the actual stage an hour before the show was amazing. There was so much to see in so little time.


This carriage was suspended above the stage when I snapped the photo. During the performance, it's the carriage that Fiyero rode in on during the first act.


This was the "bubble" that Glinda, the good witch, used throughout the show.


 All of the elements in the show had a steam punk look to them. There were gadgets and gears everywhere.


 ~ The Great Oz ~


~ The wig room ~


These are the masks for the flying monkeys. The mask with the horns on the bottom, right-hand shelf is the mask worn by the character, Dr. Dillamond, the goat.


 This gentleman demonstrated how he makes a wig using real hair.


I couldn't get enough of these flying monkey masks. The wire hair is very creepy. Notice the subtle shading and color tones in each of these masks.


One of the stage hands mentioned that he uses a laundry basket to transport the masks to the dressing rooms.


~ Wigs ~


~ Flying Monkey ~
 

~ Wicked ~


 ~ Broadway ~


We lucked out with mild weather in New York City. It was slightly overcast, but at least it didn't rain in the city.


Monday, October 22, 2012

A Day in The Catskills


What a beautiful day for a junking trip in the Catskill Mountains! On our way back from Monticello, New York, I spotted an observation deck overlooking the mountains between New York and Pennsylvania. The view was spectacular.


This scenic location is located in Port Jervis, New York.


~ A view of small-town America ~

Sunday, October 7, 2012

Bird's Eye View of the 2012 Bloomsburg Fair


This year we had the opportunity to see the Bloomsburg Fair from a new perspective. One might say we had a bird's eye view taking it all in from above. With this vantage point, I captured many usual sights from different angles. In particular, I enjoyed seeing the unique patterns on each of the tents.


 Here's an excellent example of the complementary colors blue and orange at work in advertising.


I often wonder what waits for thrill seekers inside these crazy tents. I don't like rodents, so I wouldn't waste my money. When referring to the word giant, I wonder if the giant rat would give a New York City rat a run for the money.


~ Colors, colors, and more colors ~

Saturday, October 6, 2012

Painting Project Near Completion


We're almost done painting the grotto at St. Leo's Church. The picture above shows the fountain rocks before we added green paint to depict moss.


Here you see what the fountain rocks look like with a touch of green paint.


I used a mixture of light green, sap green, yellow, and burnt umber for the moss. I diluted the mixture with some water and placed it over the rocks so as not to take away from the color of the rocks.


 I'm pleased with the results, and I can't wait to see the fountain when the water's running.


This small door, which covers the sacraments, is above the altar in the grotto. The door is metal, so I suggested that they remove it and use some gold spray paint to cover it. Then I'll use a bit of black enamel to highlight some of the raised areas on the design.

Sunday, September 9, 2012

The Painting Continues


A group of volunteers got together this afternoon to continue working on the grotto at St. Leo's Church. We're far from being finished, but we made a lot of progress today.


Other than the work that I started on the rock directly in front, the picture above shows how the grotto looked prior to our painting the walls this afternoon.


We started to introduce the use of brown, black, and burnt sienna to break up the dull grays underneath. To the right of this picture, you'll see part of the altar. I kept referring to the altar as a fireplace because the bottom resembles a fireplace. The kids got a chuckle out of that.


I still have to add some green on the rocks near the fountain to resemble moss. The grotto will look good when all the painting is finished and we get the fountain working again.

Saturday, August 18, 2012

A Painting Project at St. Leo's Grotto


I was asked to direct a group of volunteers who offered to paint St. Leo's grotto, which is located in the basement of the church. The grotto hasn't been used for a number of years, and it's time to spruce it up.


I suggested that the volunteers paint the grotto with a basecoat of a neutral color.  The picture above shows what the grotto looked like when I arrived.


The statue of the Blessed Mother is all wrapped up to protect it from paint.  There used to be a waterfall directly below the statue, and the parishioners are hoping to get it flowing again.


Let the painting begin!


The right-hand side of this photo shows where the painting began. Trying to look like stone and rocks wasn't too difficult because the surface was already sculpted to look like rocks. We just had to make sure that everyone used the same values of gray.


My paint of choice is Americana because it's easy to work with, it's not too thick, and it's easy to blend. It also provides a nice matte finish.


The rocks are starting to take shape. The sea sponges served as the best tool to paint the surface of the grotto. A paintbrush would come in handy to get into tight spots, but for the most part, a sea sponge did the trick.


We made a lot of progress today. I'm really proud of the volunteers, especially those who've never tackled a project like this before.