Tuesday, January 18, 2011

The Beauty of Ice


We were the recipients of an icy rain last night and today, and it produced such beautiful results.


Crackled ice on this Rhododendron creates an artistic effect. The two leaves in the background look like they've been sprayed with varnish.


~Tiny leaves trapped in ice~


~Pine needles frozen in time~


~A fan effect in ice~


~A bird's nest unscathed~


~A crystal tassel~

Friday, January 14, 2011

Mr. Squirrel


I just wanted to post a few pictures of the squirrel that was on my porch today. I took the photos from inside because I didn't want to scare the little guy.


Julius was watching intently as the squirrel sat nibbling on a Chinese noodle.


I placed a few peanuts on the porch, and within minutes they disappeared. He's a cute one. I hope he stops by for another visit.

Wednesday, January 12, 2011

Jewelry Demo & Book Promo Event at Barnes & Noble


Join me on Saturday, February 12, 2011, at Barnes & Noble in the Arena Hub Plaza, Wilkes-Barre Township, for an afternoon of  jewelry-making fun and information.  As a design contributor to Tammy Powley's new book titled The Complete Photo Guide to Jewelry Making, I'll be promoting the book and doing jewelry demos from 2 p.m. to 4 p.m.
I'll be on hand to show you the actual jewelry featured in the book, and you'll get a chance to see some basic jewelry-making techniques. You'll also have a chance to review the other two jewelry books by Barb Switzer that I've been published in.

I'll also have a list of my upcoming jewelry workshops being offered at Arts YOUniverse, A.C. Moore, and The Banana Factory. To learn more about the event, and to obtain directions, click here.

Stop by, and say hello. I'd love to see you!

Tuesday, January 11, 2011

Jewelry Pages on LizRevit.com


Over the Christmas holiday, I photographed samples of my jewelry, and created several pages for the jewelry pages on my Web site.  Thank goodness for Photoshop!


It's amazing how many pieces of jewelry one can make over the years. I have several pieces of jewelry on my Web site that I created when I was learning metalsmithing techniques with instructors Gary Grossman and Norah Masseti. They were fabulous teachers and great sources of inspiration and encouragement.

Feel free to stop by my Web site, and let me know what you think. I always welcome your comments. Click here to visit the jewelry pages.

Saturday, January 8, 2011

Watching Birds on a Snowy Day


The birds seem to be enjoying the light snowfall today in northeast Pennsylvania. This little guy was scurrying up and down the tree looking for food.


He finally settled down for a few seconds, and then he was off to another tree.


I don't know what kind of bird this is, but the colors remind me of a chipmunk.


This male Cardinal sat high above the ground. Directly below, I noticed a female Cardinal perched atop of the Mountain Laurel.


I love the way she blends in with the surrounding greens. I'm sure she had her eye on the male Cardinal directly above.


Wednesday, January 5, 2011

Bead Trends January 2011

Ring in the new year with some brand new jewelry projects. You'll find my champagne earrings on page 90 of the January 2011 issue of Bead Trends.

Tuesday, January 4, 2011

Two Designs in New Book

 ~image copyright Creative Publishing International, Inc.~

I'm thrilled to announce that I have two pieces of jewelry featured in Tammy Powley's new book titled The Complete Photo Guide to Jewelry Making. This book is loaded with LOTS of great projects with detailed photos and instructions. It's a great reference for anyone who is interested in learning new jewelry-making techniques or advancing the skills they already have. The book has 40 projects with more than 700 large-format, color photos.


The picture directly above shows a closeup of the first piece that I submitted for Tammy's consideration. It's a mixed-media piece with material, ribbon, seed beads, and chain. I actually painted the heart designs on tea-stained muslin and then embellished each charm with some Miyuki Delicas.


This necklace is titled Awakening and features a stoneware pendant from artist Bebe Poor of Pleasant Springs Pottery in Perkasie, PA. I discovered this wonderful artist at the Haddonfield Art Show in Haddonfield, New Jersey several years ago and purchased a lot of similar pieces from her. Her work is beautiful and goes so well with my jewelry-making style.

Since I just received my copy of the book today, I quickly skimmed through it. I was pleasantly surprised to find some designs by Andrew Thornton in the gallery section as well. I can't wait to sit down tonight and really go through this book.

A big thanks to Tammy Powley for selecting my designs for the gallery section in her book. Thanks, Tammy!
Tammy is the jewelry expert on about.com, and she also has a great blog called The Crafty Princess Diaries.

Be sure to check out all of these sites, and happy jewelry making!

Friday, December 31, 2010

Looking Forward

I'm looking forward to 2011. Even though the economy gave us a good scare this year, John and I got through. The beauty of self-employment is that you have to look for opportunities instead of excuses. You just have to keep forging ahead. 

And that's what I plan to do even after receiving some not-so-good news yesterday that's forcing me to rearrange a part of my business. My reaction to such news is usually of an analytical nature. I digest the information, but I don't overreact. After thinking about it, I looked at it from a different angle and realized that this change could, in fact, actually help my business and work to my advantage.


~image copyright Wiley Publishing~

This brings me to a fantastic book that I read earlier this year titled Trump Never Give Up: How I Turned My Biggest Challenges Into Success. I highly recommend this book. It's a very easy read, and you can finish reading it in a day or two.


~image copyright Wiley Publishing~

The biggest piece of advice anyone can take away from this book lies within the title of chapter 10: Separate Yourself From the Complaining Crowd. Simply put, don't buy into the negativity. Rise above it, and you'll be on your way. I'm not saying the road will be easy, but I can guarantee you'll be more focused on your goals vs. your complaints. Focusing on complaining gets you nowhere very fast.

As we approach a new year, I encourage you to shed that old way of thinking and do what Donald Trump does: separate yourself from the complaining crowd. Happy New Year!

Friday, December 24, 2010

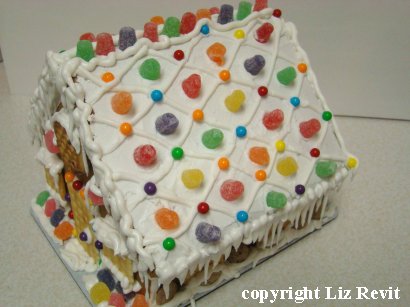
A Very Merry Gingerbread House


When John bought a kit for a Wilton gingerbread house this week, I was thrilled. I never made a gingerbread house, and John said we'd work on it together. Crafting with my boyfriend. It doesn't get any better than this.


The gingerbread house looks so nice on the box.


Let the construction begin.

 
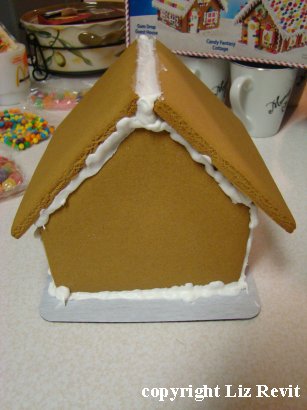
The roof is on. That's a good sign. 


I took care of the icing, and John was in charge of the candy.


Since supplies were limited, it was John's idea to use crackers for the doors and windows. We also used a fancy cookie for the second-floor window. I don't recall seeing any crackers on a gingerbread house, but I think they serve their purpose quite nicely. Good idea, John!


This is the back of the house. I wish I had seen that heart-shaped cookie before I finished the front. I think it would have looked better on the front of the house. 

John started to get carried away when he reached for the box of Cookie Crisp cereal and decided to place the tiny chocolate chip cookies around the base of the house. Yes, I eat Cookie Crisp cereal, and I love it!

 
~The right side of the house~

 
~The left side of the house~


~The roof~


~A closeup of the front~


~A closeup of the back~


Overall, I'm pleased with the results. For my first time ever creating icicles with icing, I think I did a pretty good job, and John was a big help. I have a feeling that we're going to make this a Christmas tradition from now on.

MeRRY Christmas!

Wednesday, December 22, 2010

Glittery Pinecone Ornaments


I'm in a glitter kind of mood this Christmas. Maybe I've been listening to too much 70s glam rock and funk lately. I have visions of Bootsy Collins, George Clinton, Gary Glitter (no pun intended), David Bowie, and T. Rex running around in my brain, and now I've got glitter on my pinecones. There's definitely a connection here. I even put up a silver tree this year. That's so unlike me.

In fact, as I'm writing this, I'm listening to a fabulous rendition of Lou Reed's I'm Waiting For The Man as performed by David Bowie on Bowie on the Beeb: The Best of the BBC Radio Sessions 68-72. What an excellent version of Mr. Reed's song!


Let's get back to work here, Liz. When it comes to music, I can easily get distracted. These pinecones look lovely with a good dose of vibrant colors and lots of glitter.

If you want to follow along, these pinecone ornaments are very easy to make.


Materials

* Assorted pinecones
* Americana acrylic paint by DecoArt in the suggested colors: Indian Turquoise (top photo), Winter Blue (in the three step-by-step pictures), Country Red, Avocado Dip, and Hauser Light Green
* American Painter #5 round (series 4000)
* Glitter, of course, in assorted colors
* Black, 26-gauge craft wire

 Tools

* Wire cutters
* Chain-nose pliers


Instructions

1) Paint the tips of the pinecone with paint as shown above. Work quickly because you want the paint to remain wet.


2) While the paint is still wet, sprinkle lots of glitter on the pinecone. Let dry completely.


3) Use 9 inches of wire, and bend it in half to form a loop.  Take the loose ends, and gently twist a few times to secure the loop. Now wrap the loose ends around the pinecone's stem. Push down any loose ends with your chain-nose pliers. 


4) Hang on your Christmas tree!


Here's to a very glitter-filled Christmas! I hope you enjoyed this music-infused tutorial.

Note: I'm a stickler when it comes to grammar and spelling. Blogger highlighted the word pinecone when I  checked my spelling. I checked two dictionaries, and pinecone is one word. Sorry, Blogger, but the dictionaries win.

Saturday, December 18, 2010

A Few Favorites From Tonight's Auction


John and I had every intention of viewing the "Berwick Lights" Christmas display, but they didn't have the lights turned on at 5:30 p.m. when we drove by. So, it was off to Kemler's Auction House in Bloomsburg where I saw a few interesting items. These vintage Christmas ornaments caught my eye. I love the artwork on the boxes.


I visited San Antonio, Texas many years ago, and one of the must-sees on my list was the Alamo. This toy brings back some good memories. Love those blue skies in San Antonio!

Holiday Chandelier Earrings Tutorial


Looking for a pair of earrings to go with that special holiday dress? Well, get your bling on by creating these fabulous earrings, which really pack a lot of sparkle.

~image used with permission of Northridge Media, LLC~

In case you missed this project, which was originally published in the November 2008 issue of Bead Trends, I'm happy to provide you with my instructions here.

Materials

2   3-inch pieces of 20-gauge, dead soft, round, sterling silver wire
4   1 ¼-inch pieces of 22-gauge, dead soft, round, sterling silver wire
4   1 1/8-inch pieces of 22-gauge, dead soft, round, sterling silver wire
6   1 1/2-inch pieces of 22-gauge, dead soft, round, sterling silver wire
4   4mm Swarovski round beads in the following color:  Vitail Medium
2   6mm Swarovski round beads in the following color:  Vitrail Medium
2   sterling silver ear wires    
4   8mm, 20-gauge sterling silver jump rings
6   1-inch, 24-gauge sterling silver head pins from

Instructions
 
1. To create a horseshoe-shaped dangle, use a two-inch piece of 20-gauge, dead soft, sterling silver wire. Center the wire at the widest part of your round-nose pliers, and bend the wire to form a horseshoe shape. 

2. Use the tips of your round-nose pliers to form a plain loop on each end of the horseshoe-shaped wire. Use your fingers to pinch in the top of the horseshoe-shaped wire so that the bottom of the shape is much rounder and wider.

3. Create a total of six horseshoe-shaped dangles.

4. Connect three of the horseshoe-shaped dangles together for one earring, and repeat this step for the other earring.

5. Open two jump rings using your chain-nose pliers and flat-nose pliers. Place the jump rings through the plain loops on the top horseshoe-shaped dangle.  Close the jump rings.  Repeat this step for the other earring.

6. Open the ear wire using your chain-nose pliers and flat-nose pliers. Place the jump rings through the loop on the ear wire.  Close the ear wire.  Repeat this step for the other earring.

7. Place a 6mm round bead on a head pin. Make a plain loop, and attach the head pin to the bottom of the horseshoe-shaped dangle above it.  Repeat this step for the other earring.

Note: To ensure the beaded head pin fits nicely into the horseshoe shaped dangle, you may want to lay the head pin on top of the dangle to judge how much wire, if any, you’ll want to trim before making the plain loop. 

Note: Although centered, the 6mm round beads tend to lie on top of the horseshoe-shaped dangles; whereas, the 4mm round beads will fit more easily into the horseshoe-shaped dangles.

8. Place a 4mm round bead on a head pin. Make a plain loop, and attach the head pin to the bottom of the horseshoe-shaped dangle above it.  Repeat this step for the other earring.

9. Place a 4mm round bead on a head pin. Make a plain loop, and attach the head pin to the jump rings above it.  Repeat this step for the other earring.

sources:  all materials from FusionBeads.com.